The discovery that your horse has developed corns, or indeed has corns that will not go away, must be recognised as a warning sign that something is not right somewhere in the hoof. This information will help rectify the problem and should enable you to start on a programme of preventative maintenance.
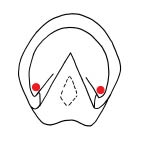
Corns occur back in the heel area at the junction where the bars meet the hoof wall – this is called the buttress of the heel. That v-shaped pocket is called the seat of the corn area and if the horse has corns there will be a reddening of the sole tissue that looks like bruising.
Often there will be no reaction to the hoof testers when they are applied to this area, often there will be no increase in the digital pulse to indicate hoof trauma but the horse just looks uncomfortable when working.
Corns are the direct result of an unbalanced hoof and poorly executed trimming methods. Put simply, in the correct and normal flight of the hoof, the heels land first at the bottom of the stride then the hoof flattens and the weight is transferred onto the toe, then the hoof leaves the ground in a forward motion. This will happen assuming that the hoof is balanced, has no flares, the heels are level and that the front of the hoof wall is in line with the front of the pastern.
However if the toe is too long it will cause the leg to land too far forward and the horse’s weight is then transferred back onto the heels, which then begin to fold in and under, which causes corns. To remedy this the long toes need to be shortened and any flaring of the hoof wall should be reduced at the toes; then the rolled under heels should be trimmed to be straight and strong and the bars trimmed short so that they are not weight bearing. If there are corns, the red tissue should be pared away slightly and disinfectant applied to stop any risk of infection.
The opposite scenario which results in corns is when the heels are too high and land prematurely while the leg is still in the downward motion, causing concussion and bruising to the heel buttresses and often resulting in the formation of corns. To correct this, the heels must be lowered. As a guide, look at the point where the widest part of the frog meets the hoof wall and lower the heels to a point just above it, then continue that level through to the toe on an even plane, trimming the bars down to near sole level. Trauma bruising to the heel buttresses will be noticed as the bars and the heels are lowered. However with the heels now lower there will be the correct frog pressure at ground level to help the hoof work properly and softly, thus eliminating concussion.

Some points to remember – when viewing the hoof for levelness, hold the lower leg at the fetlock joint and allow the foot to fall free, then sight an imaginary T-square down the back of the pastern and across the heel buttresses, which must be equal. This level must continue through the entire hoof wall ground surface to the toe. The walls should be an even thickness also from heel to toe. Then taking the hoof forward, view the shape of the coronary band and rasp away any flares at the bottom of the hoof wall to mirror image this shape.
Hoof preparation for shoeing must show a concave sole, with neatly trimmed bars, level hoof wall of even thickness and at sole height. For the unshod hoof, the wall should be left about four millimetres above the sole for comfort and clearance of the sole.
Remember – a correctly balanced hoof will remain free of problems.
