QUESTION: What is wrong with these photos? And why is this nail pattern wrong?
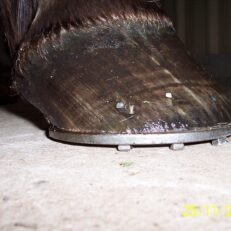
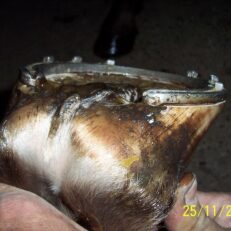
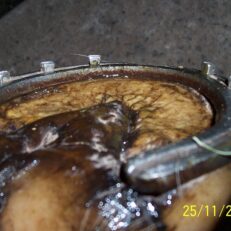
ANSWER: The nails are in the wrong holes in a nail pattern that is too close.
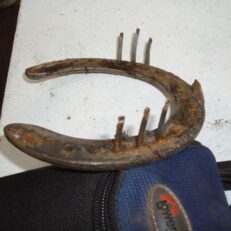
From a practical point of view for the horse, this close nail pattern totally restricts the movement in the front quarters of the hoof. Not only is this uncomfortable for the horse, but the danger is that with the back half of the shoe unsupported, it often allows the shoe to move sideways causing a great danger of the opposing foot stepping on the shoe and pulling it off. When this happens, this close nail pattern will totally destroy that area of the hoof wall, making it very difficult to refit a shoe correctly without major repair to that hoof wall.
Studies have shown that a more spaced out nail pattern centering around the widest part of the hoof stabilises the shoe much better and eliminates distortion of the hoof wall between shoeing.
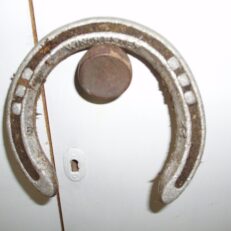
I start from the second nail hole back from the toe, then miss a hole, nail a hole, miss a hole and nail a hole. Where the hoof wall is not sound enough, there is no point in putting nails into a bad part of the hoof wall. If this wall cannot be repaired synthetically, the nails should only be put in the strongest part of the hoof wherever that may be. At times, four good nails are much better than six.
In USA, the majority of farriers I have seen use eight nails in every hoof. Perhaps this is because they are a bit haunted about using toe clipped shoes. However, this is extremely detrimental to the hoof expansion. It is almost as bad as using the modern fad of quarter clipped shoes.
As well as nailing in a good nail pattern, the nails should be selected to fit the shoe with the heads protruding no more than about two millimetres which allows for clinching to bring the heads back to be level with the shoe surface. Selecting nails simply means that if the nail fits the shoe, the shank is going to be the right thickness so that it doesn’t distort the white line any more than is absolutely necessary.
The nail pattern of most European horseshoes is set too coarsely, which brings the nails inside the white line and very often brings the nails inside the sensitive laminae at the bottom of the hoof. This is dangerous and detrimental to the horse’s safety and comfort. The nail should be right on the white line. If it is placed outside of the white line, it will crack the hoof wall. If it placed inside the white line, it will hurt the horse. It should be right ON the white line.
I had a 14 year old girl on my last two day course. She and her mother made the decision to attend after her horse sprung a shoe at a recent event; she had tried to replace the nail, but put it in back to front, and pricked the horse. Full credit to her for trying, and now she knows how to replace a shoe she won’t ever do it the wrong way again. I believe all horse owners should be able to remove a shoe and do simple maintenance – events are generally at weekends when farriers are nowhere to be found.
You will observe that the horseshoe nail is beveled on one side, and flat on the other. Hold it between thumb and forefinger with the flat side facing outwards. When nailing into the hoof, small taps tend to cancel the bevel on the end of the nail. After the first hit to lodge the nail, hit positively and drive that nail home with as few hits as possible. To imprint it into your mind remember: FLAT OUT AND GO LIKE HELL.
There is absolutely no reason for a horse to become nervous or jittery when the shoes are being nailed if it is being nailed with the correct selection of nails into the correct shoe for that size hoof after the hoof has been correctly balanced.
We must never do anything to the horse’s hoof unless we fully understand how to do it, and why we need to do it. And it must be a pleasant experience for the horse. Anything we do must enhance his performance and not inhibit it.