To even begin to understand HOW and WHY a crooked hoof regrows crooked, we need to look closely at the conformation of the horse.
NOTE: This article is in reference to the front of the horse only. A future article will deal with the hind leg movement.
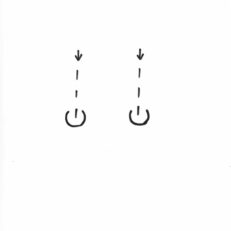
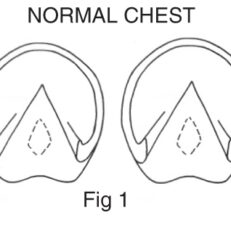
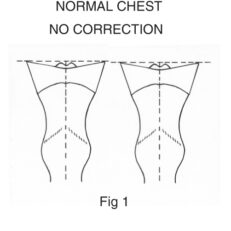
Viewed from in front (FIG 1) the correct straight legged horse’s leg bones are in line from the forearm to the pedal bone, which is positioned correctly inside the hoof capsule. As a result, the hoof does not distort or develop flares and the flight of the hoof is in a straight line.

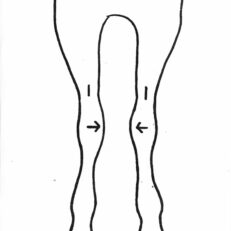
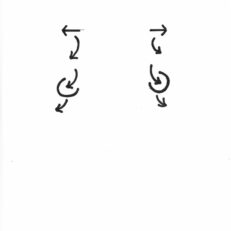
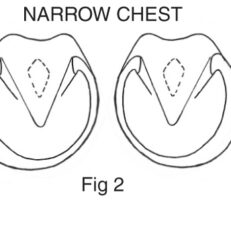
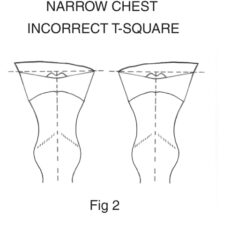
The leg bones of the splay footed horse (FIG 2) are out of alignment; the shoulders are narrow, so the forearms slope inwards causing a knock kneed appearance. Lower down in the hoof the pedal bone positions itself under the centre of the knee to maintain the horse’s balance; this creates an imbalance in the hoof capsule, resulting in an outside flare and a dishing gait as the leg moves forwards.
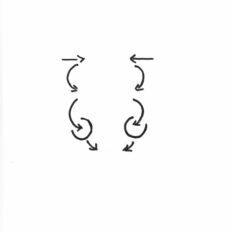
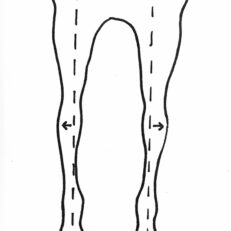
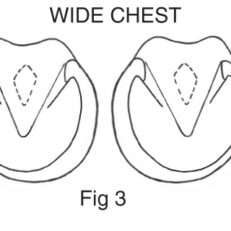
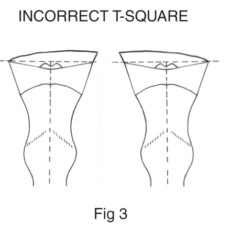
The leg bones of the pigeon toed horse (FIG 3) are also crooked; usually the horse is wide chested and the result of this is that the top of the cannon bone is set to the outside of the knee joint, giving a bowed out appearance. Lower down in the leg, the pastern turns inwards to maintain balance, but in the hoof the pedal bone positions itself under the centre of the knee, causing an imbalance in the hoof which creates a flare to the inside, which results in a paddling action as the hoof moves forwards.
It is so important to really understand the principles of cause and effect when trimming any out of balance hooves. The CAUSE is the less than perfect conformation; the EFFECT is the resulting flare in the hoof capsule. It is important to also understand that the pedal bone is where it is supposed to be and that the frog is always positioned correctly under the pedal bone; so if we clean out the sole and find the outermost junction of the true sole/hoof wall, it is obvious where excess hoof wall needs to be removed.

Regardless of whether the horse’s hoof is turned out or turned in, our aim should always be to maintain a T-square, with the centre line down the back of the pastern and the top of the T at a perfect right angle across the heels of the hoof capsule (these heels must NEVER be lower than 6mm above the clean widest part of the frog). This alignment ensures that the hoof lands correctly and evenly and minimises the dishing or paddling, maintaining soundness for as long as possible until the faulty conformation begins to distort the hoof capsule again.
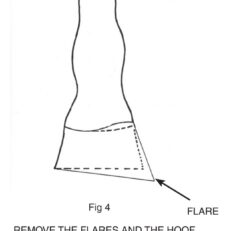
Now we must look at the cause and effect in relation to correcting the bottom of the hoof (FIG 4). The pedal bone is suspended in the hoof capsule and is attached to it by soft tissue called laminae, and also sits on top of the digital cushion above the sole. In the crooked hoof, the laminae is stretched on the side where the flare is and the coronary band is also pushed up above the flare.
When the flare is removed and the hoof is levelled to achieve a T-square across the heels, it is important to allow a few minutes for the hoof to settle under weight and you will then observe that the flared side has dropped again and needs to be re-corrected; some excessively flared hooves will move out of level three or four times before they stabilise, thus a lot of crooked gait problems are not successfully solved because the shoe has been applied too soon. Whether the hoof is to be shod or left unshod, this recognition of the re-alignment is an important detail for the prevention of hoof related lameness.
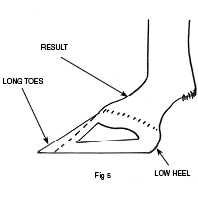
Long toe/low heel syndrome (FIG 5) is also conformation related and is usually the result of long sloping pasterns; uncontrolled flares in the front of the hoof cause excessive pressure on the rear of the pedal bone thus crushing the digital cushion and the heels of the hoof, whereas controlling the long toes eliminates heel pressure which allows the pedal bone to be three to five degrees higher at the heel than at the toe, which is anatomically correct in relation to the digital cushion. Once again, take the time to allow the hoof to settle, and then readjust the toe length. It is only a matter of time and those low heels will begin to stand up again.
In summary: the front of the hoof and the pastern must be parallel. P1, P2 and P3 must also be parallel; the hoof wall is meant to be an even thickness from top to bottom and around its ground-bearing perimeter.
The end result of all these parameters is that there will be no flares anywhere in the hoof and when the bottom of the hoof is measured from the toe to a straight line across the buttress of the heels, the half-way point is 19mm behind the active tip of the frog.
Remember- a flare anywhere in the hoof is your greatest enemy.